Automated end-to-end tests
Automated end-to-end tests simulate real users interacting with your website to make sure that your application works as expected. They run in a headless browser environment so they can be easily integrated into your Continuous Integration (CI) pipeline.
Think about the impact of your application being unavailable or not working for even a short period of time, or worse you not even noticing it. Besides the impact on your revenue, t can also have a negative impact on your brand and reputation.
Having automated end-to-end tests in your CI pipeline will also increase your productivity by giving you the confidence to ship faster or more often (See The Power of Testing) as you will reduce your manual testing efforts and have guardrails in place to catch issues before they reach production.
Workflow
Section titled “Workflow”- Developer opens a pull request from a feature branch.
- CI pipeline creates a preview environment.
- Automated end-to-end tests are executed against the preview environment.
- Feedback is automatically provided in the pull request, preventing regressions.
For additional safety, you can also run your end-to-end tests against a pre-production environment before deploying your changes in production or directly in production as End-to-end test probes
Playwright, developed by Microsoft, is the end-to-end testing solution I recommend.
Other solutions such as Selenium, Puppeteer or Cypress do not come close when it comes to reliability and developer experience.
You can use fixtures to set up independent test contexts for scenarios such as disabling your cookie consent banner. You can use promises natively and a wide range of locators to find elements in your page.
Here is a simple example of a test I developped for Zalando’s website that navigates to a catalog page, applies a filter and verifies navigation to a product detail page:
test("Test catalog landing journey for zalando", async ({ page }) => {  const catalogNav = await page.goto(catalogLink);  expect(catalogNav?.status()).toBe(200);  await expect(page).toHaveURL(title);
  await page.getByRole("button", { name: /farbe/i }).click();  await page.locator("label[for=colors-BLACK]").click();  await page.getByText(/speichern/i).click();
  await expect(page.getByTestId("is-loading")).toBeVisible();  await expect(page.getByTestId("is-loading")).not.toBeVisible();
  await page  .locator("article[role=link]")  .locator('a[href$=".html"]')  .first()  .click();
  await page.waitForLoadState("domcontentloaded");  await expect(page).toHaveURL(/.html/i);});
This simple test helps us validate that customers can navigate to the catalog page, interact with filters, are able to see products and navigate to a product detail pages to add products to their cart which is a critical user journey for Zalando.
I won’t go into all the details of Playwright as the official documentation does a great job at explaining the concepts and features. Microsoft also created a great training course to get you started.
Recipes
Section titled “Recipes”You can find the entire recipes alongside code example on github.
Setup Playwright in your project
Section titled “Setup Playwright in your project”- Intall Playwright and follow the CLI. For the tests, use a folder of your choice and say yes to adding a Github Actions workflow and installing Playwright browsers:
Terminal window pnpm create playwright --install-depsThe CLI added folders to our .gitignore configuration, packages to our dev dependencies and created the following files:
-
playwright.config.tswhich is Playwright’s configuration file-
demo-todo-app.spec.tsintest-exampleswhich contains an advanced use case for a todo app covering most of large apps use cases. We will ignore this file but you can use it as a quick reference later-
example.spec.tsin your tests folder which is where we will write our main tests for this demo- Update
playwright.config.ts
For starters, let’s focus on the simplest setup to make sure our website is up and running with its core functionality so we will remove tests for firefox and webkit for now under projects, comment them out.
We will add a BASE_URL env variable, under use add the following:
use: {baseURL: process.env.BASE_URL;}- Update
- Prepare your first test, update
example.spec.tswith only one test case:
test("is up and running", async ({ page }) => {const pageNavigation = await page.goto("/");expect(pageNavigation?.status()).toBe(200);await expect(page).toHaveTitle(/%YOUR_REGEX_TITLE%/);});Because we will be using
process.env.BASE_URL, ”/” will directly hit your base url path.In my case, it will go to
https://automated-end-to-end-tests-example.vercel.app/and I configured my title regex as/Automated End-to-End Tests example/- Prepare your first test, update
- Test that everything is working:
Add a script to your package.json:
"e2e": "playwright test"Run the script command using your preferred package manager:
Terminal window BASE_URL=%YOUR_BASE_URL% pnpm run e2e
CI Setup with Github Actions
Section titled “CI Setup with Github Actions”There are many different setups you can go for such as running a local server to validate your end-to-end tests against but this is not what I would recommend. What will really bring value to you is running your end-to-end tests against your preview deployments before merging your changes to your main production branch.
If you synced your github repository with a vercel project, you should already have preview deployments running out of the box.
There is only a few more steps to take:
- In your Vercel project settings, go to
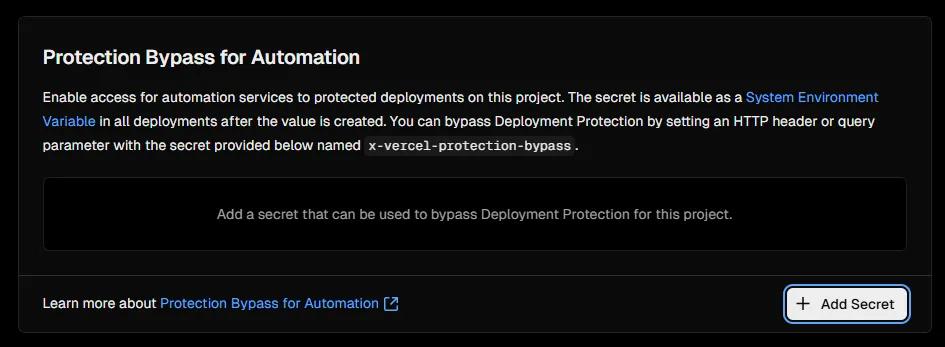
Deployment Protectionand in the sectionProtection Bypass for Automation, clickAdd Secretand in the pop-up which opens immediately clickSave.

This will let Vercel know you are the one running automated tests against your preview environment and authorize the requests.
Copy the value of the secret, you will need it for the next step
- In your Vercel project settings, go to
- In your github repository settings, go to
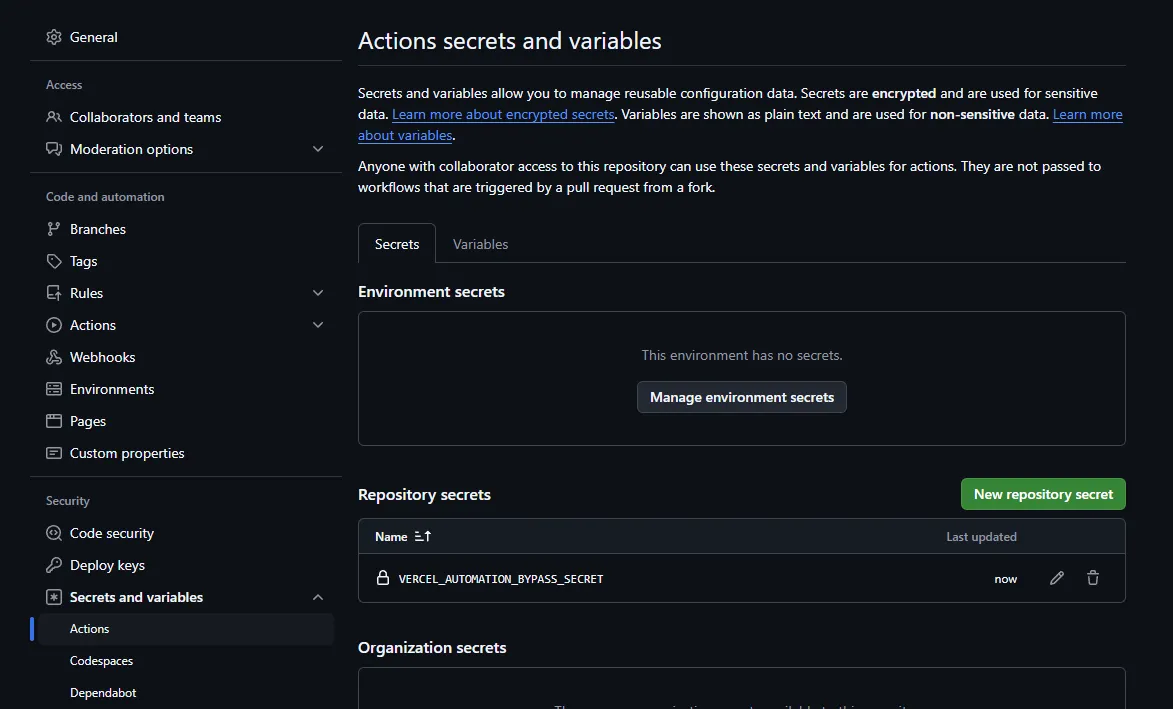
Secrets and variables>Actionsand add your secret value under the nameVERCEL_AUTOMATION_BYPASS_SECRET

- In your github repository settings, go to
- Let’s update our github action yaml file which should be under
.github/workflows/playwright.ymland copy the following, adapting with your favorite package manager:
name: End-to-End Testson:deployment_status:jobs:e2e-tests:if: github.event.deployment_status.state == 'success' && github.event.deployment.environment == 'Preview'timeout-minutes: 10runs-on: ubuntu-lateststeps:- uses: actions/checkout@v4- name: Install pnpmuses: pnpm/action-setup@v4- uses: actions/setup-node@v4with:node-version: lts/*cache: "pnpm"- name: Install dependenciesrun: pnpm install- name: Install Playwright Browsersrun: pnpm exec playwright install --with-deps chromium- name: Environment URLrun: echo ${{ github.event.deployment_status.environment_url }}- name: Run Playwright testsrun: pnpm run e2eenv:BASE_URL: ${{ github.event.deployment_status.environment_url }}VERCEL_AUTOMATION_BYPASS_SECRET: ${{ secrets.VERCEL_AUTOMATION_BYPASS_SECRET }}- uses: actions/upload-artifact@v4if: ${{ !cancelled() }}with:name: playwright-reportpath: playwright-report/retention-days: 1This will run on every Vercel preview deployments and it will:
1. Checkout your repository
2. Install pnpm
3. Setup nodeJS
4. Install dependencies
5. Install Playwright browsers (in this example, I explicitely only require chromium)
6. Display the value of the environment URL against which the end-to-end tests will run
7. Run the tests
8. Upload their results so you can download and view the report HTML in case of failures
on Step 7 (Run Playwright tests), we are setting 2 environment variables, the BASE_URL for the preview deployment which Vercel gives us and the github action secret we just created
- Let’s update our github action yaml file which should be under
- The final thing to do is to update our
playwright.config.tsto send thex-vercel-protection-bypassheader to Vercel, so we update the value ofuseto:
use: {trace: "on-first-retry",baseURL: process.env.BASE_URL,extraHTTPHeaders: {"x-vercel-protection-bypass": process.env.VERCEL_AUTOMATION_BYPASS_SECRET!,"x-vercel-set-bypass-cookie": "true",},},Also set
x-vercel-set-bypass-cookieto true so the header value is also sent on subsequent requests should we need it. Read more about Protection Bypass for Automation on Vercel- The final thing to do is to update our
- Test everything
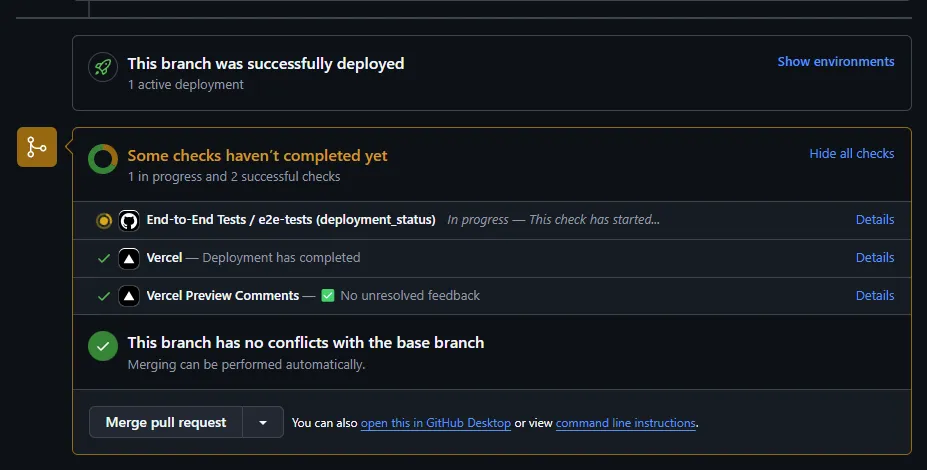
Merge the changes to your main branch, create a small changeset on any branch and create a pull request against your main branch and you should see your new workflow running:

It will run again on every push with a result similar to this
Coming soon.